Tuesday, October 23, 2012

Simple applique with bow tutorial


This is just going to be a short post on doing a simple applique with a bow.

To begin you will need all of your supplies :
~Embroidery machine
~A way to transfer the design to your machine
~Thread
~Shirt (or item to be appliqued)
~Applique material
~Stabilizers  in this case I'm appliqueing a shirt so I will use a tear away (iron on tear away) and a cut away
~Comfort Cover (goes on the back of the applique so keep your little one from being itchy :)
~Heat N Bond lite  (for your applique material (make sure you use lite and not the ultra!)


     So here we go, I am not going to give instructions on how to find the center of your shirt because I do not do it the proper way, I usually just eye it or fold the shirt in half and iron a crease which I know is not the way should probably do it but I have always had great luck with this way so it works for me :) So once you have your shirt or whatever it is you are applique centered you apply (iron on ) your iron on tear away ( I use Sulky ) I have tried others but I always seem to go back to this brand just my preference.


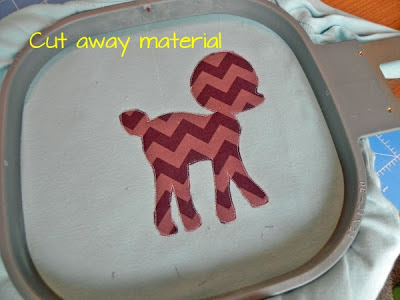
Then I hoop my shirt and the cut away together. The cut away that I use is just commercial I buy it in bulk so it last longer!

I'm going to use my Baby Deer applique because I have added the tack down for the bow but it will be the last step so if you don't want a bow just skip that step!Then stitch out the guideline stitch. If the applique has more than several pieces of materials or thread changes then you may want to use your stitch map to guide you through the steps. This is a simple one piece of material applique so I don't think the stitch map is neccessary. 


Now lay down your material and stitch the tack down stitch. After you tack down your material then trim around your stitch.


Finish the next steps and stop after you stitch the guideline stitch.  The GREAT part about this is if you don't want a bow then just stop before the guideline stitch and your done! 


Here you need to center your bow, sometimes I will make my own but I was completely out of pink ribbon (can you imagine) so I'm using a pre made bow that I had (these you can get from Hobby Lobby I think 3 come in a pack. You will need to center it over your guideline stitch and I use tape on both sides (just regular scotch tape) to secure the bow until the tack down is stitched.


Now you are ready to stitch the last stitch which is a triple stitch to really secure it (I'm sure you know this but just in case, it's good to match your thread color to your bow :)) Then remove your tape!


Now turn your shirt inside out and tear away the tear away stabilizer and trim the cut away stabilizer closely around the applique (be careful not to cut your shirt) and iron back of applique to set the heat N bond

Iron on your comfort cover this makes the inside of the shirt soft and comfy for your little one!

You are done!! Any questions or comments just ask or email me !


Here it is without the bow :)

Click here for a link to this design.

Tuesday, October 2, 2012

Football with tutu tutorial


      First you will need the basics, your machine, a way to transfer the design to your machine, embroidery thread & stabilizer, oh and scissors.:)
Material for the design, football and bow material, either ric rac or a scrunchie ribbon (a straight ribbon does not work very well here because of the curve) tape, tulle for the tutu


I did the 5x7 (designs comes in 4x4, 5x7 , 7x5 & 6x10) and notice the pink ribbon from the picture above...I decided to go with a ric rac instead :)  
Step 1~ Stitch out the football (guideline, tackdown stitches) 

Step 2~ Stop at the the guideline for the tulle (step 6 on the stitch map)


Step 3~ Tape down the tulle and make sure you are completely covering the guideline stitch...I layered my tulle, 3 layers but I think even thicker would probably be cuter!


Step 4~ Stitch the tack down for the tulle and trim


Step 5 ~


 Don't walk away during this step!


Monday, August 20, 2012

Party is done!

     Good Morning!! I know its been awhile :( I'm gonna start this post with  famous words from Walt Disney...

     My girls birthday party was yesterday, I think that may be the very last party I have at my house LOL I think it was a success and I know they had fun so that's what counted! Everything Minnie had to be!!! I will start off with my applique news :) I have several new designs and 6 new Halloween feltie designs that will be listed this week, and I will have them 50% off the first couple of days after I list them! I was thinking about adding a tutorial on the feltie designs although I have one included in the zipped file when you purchase from me so I haven't decided yet whether or not I'll do that. If anyone wants a tutorial let me know and I will post one!
Now just a few pictures from the party!
      After making these bows my Mom asked why didn't I have an "M" in the middle of the Mouse head......I didn't even think about it but I wish I had...that would have been adorable! It must not have been on my list haha YES I'm one of those types I have a list for everything if I didn't I cant imagine how chaotic everything would be :)

     These shirts I think turned out adorable BUT it wasn't easy trying to convince my 6 year old that the shirt needed to be green instead of pink...she wanted pink (her favorite color) but I knew the Mouse's dress wouldn't show up well on pink and the party theme colors were green & pink soo...she never actually agreed but when I got finished she liked it .

      I wanted to do it all myself...not sure what I was thinking at that moment! Third time ever I have made cake/cupcakes and buttercream icing but it was the very first time I made it and needed more that one color, they were very cute and tasted good too but baking is not my talent not even a little bit, my 3 kids were running around overly excited about the party so that made it much harder BUT I do much better in my sewing room than in the kitchen (my husband is a great cook!) Thank goodness :)
      Not a good pose but the best I could get because I called them in there from playing and they did not want to stop what they were doing (I'm always with a camera too so they get a bit tired of it)

     just more decorations...
    My babies opening their presents :)

     Okay so I don't bore you with all my party pictures I will stop there!

Here are a few of the recipes I used (from Pinterest)


                 I'm not even sure what these are called other than Hershey Kiss treats !


      It really doesn't get any easier than that! So for a fast & cute treat this is the way to go! and then I did the white chocolate covered Marshmallows, almost as easy (they took a few minutes longer (20 min total) but still VERY easy and like I said I'm, not a cook so if I say its easy you should believe it!


Ta Da...so cute and a big hit!


       So I have been very busy lately preparing for the Madison's first day of school, the birthday party and working on new designs so now that I'm one less child at home today and the party is over I have plenty of time to play catch up!! I am off to do some test stitching.
Someone asked me to add a pin it button to my post...after some ((LOTS)) of  research I finally figured out how to add it so there is a pin it button at the bottom of my post!
And so to end the same way I began with another one of Walt's Quotes....I would rather entertain and hope that people learned something than educate people and hope they were entertained.


Thursday, July 19, 2012

Inspirational must read!!

This is a guest post on my blog, I don't know her personally but she has an inspirational story (journey she has had) that I think is very touching and I would love to help build awareness and share her message!

 Heather Von St James is a 43-year-old wife and mother. Upon her diagnosis of mesothelioma, she vowed to be a source of hope for other patients who found themselves with the same diagnosis. Now, over 6 years later, her story has been helping people all over the globe. She continues her advocacy and awareness work by blogging, speaking and sharing her message of hope and healing with others. Check out her story at the Mesothelioma Cancer Alliance Blog.


Winning the Battle

One of the most wonderful times in a woman’s life is when she’s expecting a child.  I was blessed with a normal pregnancy and my excitement grew with each little movement and kick. Lily, my darling baby girl, was born vibrantly healthy with a full set of fingers and toes via emergency c-section on August 4, 2005.  My husband, his family, my parents and many dear friends, “my village” as I like to call them, were there throughout my pregnancy and Lily’s birth.  Life seemed perfect with so much to look forward to as each new chapter in this life unfolded.

I had to go back to work when Lily was about a month old.  I wasn’t feeling well but was told that the fatigue and breathlessness was because I had just given birth; a bad case of “baby blues.” However, I felt there was something wrong and contacted my doctor.  After many tests, the diagnosis revealed much more than we expected.

During one of the most joyous times of my life, with a three-and-a half-month-old baby girl, I was slapped with devastating news.  On November 21, 2005, I was diagnosed with malignant pleural mesothelioma; a type of cancer caused by exposure to asbestos. As it turns out, I came into contact with asbestos when I was just a child, 30 years ago. If that wasn’t bad enough, the doctor gave me 15 months to live unless I began treatment immediately.  I had so much to live for and I couldn’t imagine my loving husband and new baby girl having to go on with out me. I knew I had to do whatever I could to beat this monster and that meant getting the best treatment possible.

We headed to Boston, the home of one of the best mesothelioma doctors in the U.S.  My folks took care of Lily while my husband and I went off to seek his help.  On February 2, 2006, I underwent an extrapleural pneumonectomy, a procedure that removed the affected lung and all its surrounding tissues.  I stayed in the hospital for 18 days. Two months later, I started treatments of radiation and chemotherapy.

Throughout our time in Boston, our village grew. We met other families who were going through the same thing; their support was invaluable. They leaned on us and we leaned on them. Back in South Dakota, my parents gained their own little village. Girls who I used to baby-sit for, now grown with families of their own, offered to watch Lily while my parents worked. Their support means more to me than I can ever express.

Motherhood is a 24-hour joyful and stressful job but I never dreamed I would be battling the curse of mesothelioma at the same time.  It was so hard missing those cherished moments in the first year of Lily’s life. Those precious moments, that my parents shared with me though photos, made me determined to win this battle. My fight paid off, as I’m now cancer-free.

Along with the visions of my beautiful baby girl, it was “my village” of family and friends that gave me the strength to reach for the stars and beat this cancer.  I knew I needed to be here for those who loved and supported me through it all. Life is so precious and cancer is a curse; never give into it.


Diagnosis of Mesothelioma 

Wednesday, July 11, 2012

Party planning :)


      I'm glad to say it is still early in the week and I'm running AHEAD of my schedule! Which is a very good thing right now because next month is both my girls birthdays, turning 6 & 3 and I'm one of those crazy people that plan everything out a month or 2 in advance for a party that last maybe 2 hours and then swear that I'll never do that again...until next year :) This year they want a Minnie mouse themed party, it will be a double party (as long as I can get away with doing a 2 in 1 party I will!!) So my next couple of weeks are going to be getting everything together for the party so (and getting my oldest ready for her first day of school) I may not get to many more designs out over the next month. However I will be answering emails so if u need anything I will get back to you! I think July & August will always be very busy for us because of the 2 birthdays and school starting.

     My mom went yard selling the other day and got the girls some really cute clothes....one skirt (childs place) adorable camouflage with appliqued roses on it...she (my 5 yr old) wasn't very thrilled with the skirt...if its not pink and shinny shes not interested so I knew I had to figure out something to do with a shirt to match the skirt so she would wear it because it is sooo cute! So on a pink shirt I added a simple raggedy rose applique, it looks simple but not quit as easy as it looks...you do the guideline stitch first then I took a strip of material I cut very thin (this probably would have been a lot easier done with ric rac or ribbon but I wanted it to match the skirt) after the guide line is stitched I sprayed with adhesive glue over the stitches and carefully laid down the material, then did the last stitch and it's done! Seems simple enough but getting the material laid just perfect over the stitches took a few minutes! I'm going to add this to my website on the free designs if anyone would like to try it! I would love to see any pictures of your work I would love to see how creative you can be with suck a simple design!! (Click on the word free and it will take you to the free designs page).


     I think it turned out cute but most importantly, my daughter loves it so WIN :) and of course she had to have a matching bow! Oh and since I mentioned adhesive spray < I had a question from someone the other day about the brand I use so originally I used the Sulky KK2000 which I get from Joanns but recently was at my local sewing shop and saw this 505 spray adhesive, it only cost 12.99 versus the Sulky which is 14.99 but the can is twice as big, a little over 8 oz. and with the Sulky you only get 4 oz so way better deal and I have used it and it works just as good. I don't use spray adhesive a whole lot so it last a long time for me but if you use it often I would definitely check into this 505 way more for your money!  Here's a picture so you can see what the can looks like. This may already be a widely known brand I have no idea its just new to me and I thought I would share since its such a good deal!


      I made this for a friends baby the other day, ( this applique is also listed under the free designs) the party was zebra themed so it matched great! I love the little bloomers they are always fun to do!


     I have been spending time that I do not have on Pinterest :) I love all of the creative ideas!! If anyone has any party ideas (Minnie Mouse) I would love to hear them I'll be preparing for the next month trying to gather ideas and things I can do & make for the party! email me at appliquecrazy@att.net